The system allows for saving the current positioning of objects on screen in a View, so you can reload this view of objects in the future, just by reloading the saved View.
•Views are always categorized according to their layout, meaning you can create and save views for different layouts.
•You must choose a unique name for this view within its category (Layout).
•The system allows views with the same name, as long as they have different layouts.
•You cannot create views for 1 object layout.
•By default, the system will only display tiles from the selected layout in the Object List, unless the Display views from selected layout only option is unchecked.
To create a view, select the desired layout, place the desired objects on the screen and click the Save View button:
![]()
The following screen will be displayed, with options for saving the view:
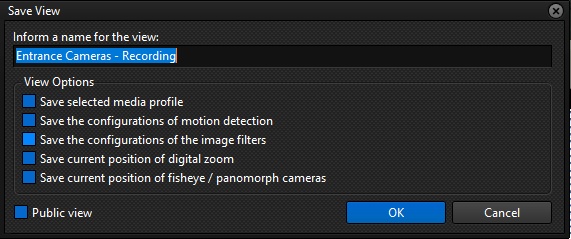
•Name: Enter a name for the view. This name must be unique for the selected layout.
•Options: The options selected here will be saved along with the view, so when it is loaded again, these saved options will be applied.
oSave selected media profile: Selecting this option will save the current Media Profile for each camera.
oSave motion detection settings: Selecting this option will save the motion detection settings along with the view. To learn how to configure motion detection, see the Motion Detection Settings chapter.
oSave image filter settings: By selecting this option, the image filter settings will be saved along with the view. To learn how to configure image filters, see the chapter Image filters.
oSave Current Digital Zoom Position: By selecting this option, the last digital zoom position left on each camera will be saved. To learn about digital zoom, see the chapter Digital PTZ.
oSave current position of fisheye/panomorph cameras: Selecting this option will save the filter, mode and current zoom position on the 360 camera dewarp. To learn about Fisheye / Panomorph lenses, see the Fisheye / Panomorph Lenses chapter.
•Public View: Select this option to indicate that this is a Public View, or deselect it to indicate that it is a Private View. The Public View will be displayed to all users on the system, while the Private View will be restricted to the user who created it.
The Public View will be displayed in the object list with the following icon:
![]()
The Private View will be displayed in the object list with the following icon:
![]()
Views will dynamically update in real time when created, updated or deleted on all clients, without the need to reconnect to the server.
To delete a mosaic, select the desired mosaic and click the Delete button:

The Clear button, represented by a trash can, will remove all objects on screen.