An I/O input can be, for example, a motion sensor or panic button.
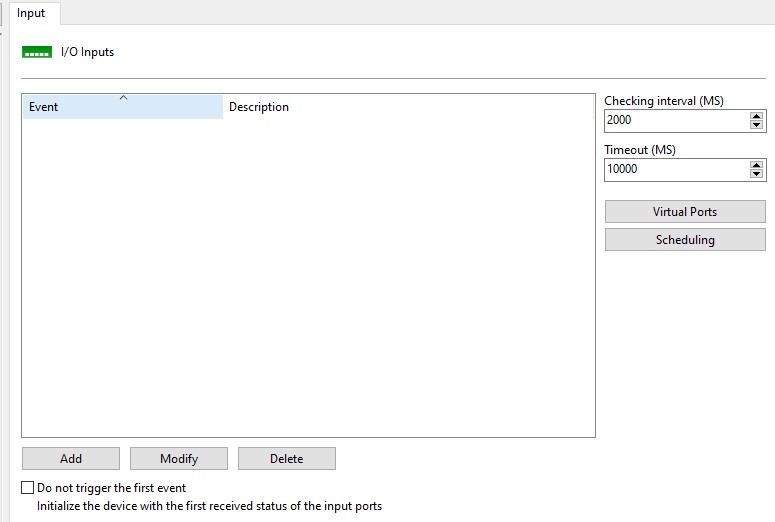
•Checking interval (ms): Interval at which the system will communicate with the camera to recognize an input event, for example, a presence sensor.
•Timeout (ms): Interval at which the system will attempt a new connection with the camera if the current connection is lost.
•Do not fire the first event: When selecting this option, the system will ignore the initial status of the I/O port, so that triggering will only begin at the first status change. This option is particularly useful to prevent the system from generating events at server startup or when a camera is saved (If the conditions of any input event are satisfied).
To add an input event, click Add. To change an input event, click Modify. To delete an input event, click Delete. All of these buttons refer to input events, located right below their list.
By clicking Add, the following screen will be displayed:

•Event name: Camera input event name.
•Description for this event: Camera input event description.
•Latitude / Longitude: You can define a geographic position where the sensor is located. This position can be used in Operational Maps and in event search to show where the event was triggered.
•The event will occur when: Complete this list according to your needs. In the example above, it was configured so that the event is only generated when port 1 of the camera's alarm input is activated. Combinations can be created such as port 1 activated, 2 activated and 3 deactivated. To add an event, click the Add button. To change and delete, click on the corresponding buttons. When clicking on the add button the following screen will be displayed:

On this screen select the gateway and its state for the event being configured to occur.
•Event Rearm Time: Define a time for the system to reset this event after a trigger. For example, if you configure the event with a reset of 60 seconds and this event is recognized again before 60 seconds, then the system will ignore this new trigger.
•Scheduling: Allows the operation schedule of this alarm.
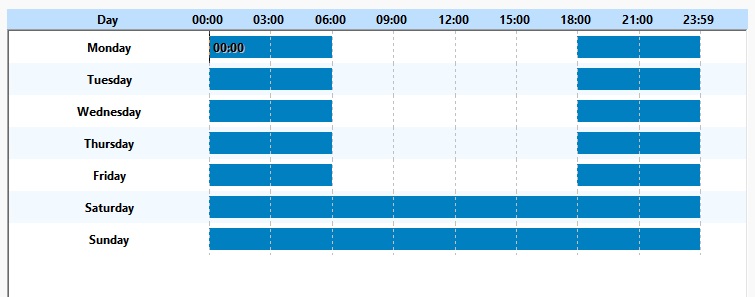
The operation of this schedule is identical to the screen specified in the topic How to Configure the Recording Schedule with the difference that the I/O operation must be chosen between Activate or Deactivate.
In the example above, this event will only be recognized between 00:00 and 06:00 and 18:00 until 00:00 on weekdays and during the whole period throughout the weekend.
•Configure Actions button: Click this button to configure the actions that the system will take when this event occurs. To learn how to configure actions, see How to configure alarm actions.