In large installations with multiple monitoring stations and servers, registering and managing (adding or removing) servers in the Surveillance Client can be an extremely time-consuming task. To facilitate the management of these server records in the Surveillance Clients, it is possible to create a single list with the registration of all servers and when opening the Surveillance Client, it will download this list and register these servers locally (Only for the session current) automatically, so if you need to add a server, remove a server or even change the connection parameters of a server, you can do it once in the configuration file and all Surveillance Clients will be updated automatically the next time once they are started.
The registration of servers must be done in a script file with .dssf extension in XML format.
File syntax:
<DigifortSurveillanceScript version="1.0"> <Servers Exclusive="True">
<Server Name="SERVER_NAME_1" Address="SERVER_ADDRESS" Port="SERVER_PORT" UseSSL="True|False" ConnectionMode="Internal|External" MediaReceiveMode="Unicast|Multicast" AutoConnect="True|False" />
<Server Name="SERVER_NAME_2" Address="SERVER_ADDRESS" Port="SERVER_PORT" UseSSL="True|False" ConnectionMode="Internal|External" MediaReceiveMode="Unicast|Multicast" AutoConnect="True|False" />
</Servers> </DigifortSurveillanceScript> |
You can add as many servers as you want to this list, just by creating more records. See an example file below:
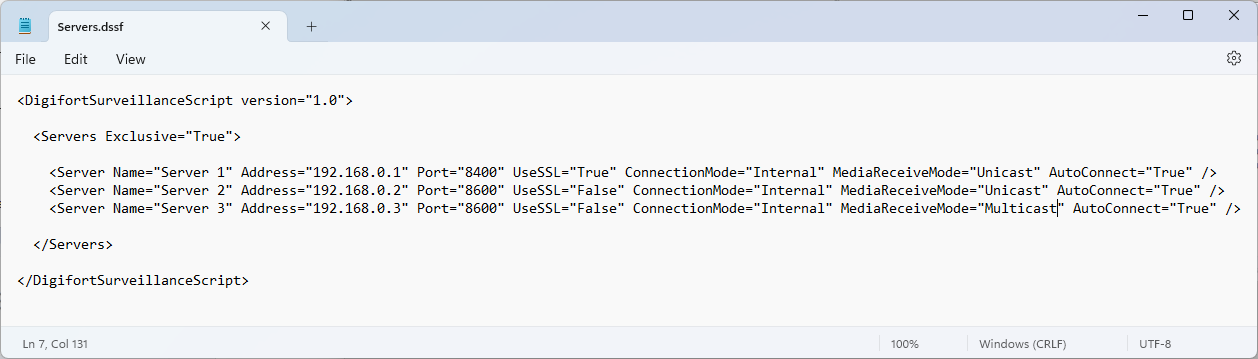
•Name: Provide a name for the server.
•Address: Provide the server address.
•Port: Provide the communication port. 8600 is the default port for normal connection and 8400 is the default port for SSL/TLS connection.
•UseSSL:
oTrue: Enable the use of SSL/TLS (Don't forget to provide the SSL port, 8400).
oFalse: Uses connection without SSL/TLS (Don't forget to provide the default port, 8600).
•ConnectionMode: Provide connection mode:
oInternal: Select Internal if the Surveillance Client is running on a local network, or if the cameras are configured to transmit via Relay (Default).
oExternal: Select External if the Surveillance Client is running outside the server's local network and the cameras are configured for direct transmission (No Relay).
•MediaReceiveMode: Select between Unicast and Multicast for the default media transmission mode.
•AutoConnect:
oTrue: Select True for the Surveillance Client to automatically connect to this server when opened.
oFalse: Select False so that the Surveillance Client does not connect to this server automatically when opening. The user must manually connect (by double-clicking on the server) to each server.
With the server registration file complete, you must now place it in a location where Surveillance Clients have access. You can use 2 options for this:
Shared Folder:
You can place the server registration file in a shared folder on the network, as long as all Monitoring Clients have access to this file. To instruct the Surveillance Client to download this file over the network, you must create a file called Script.ini and place this file within the client installation folder:
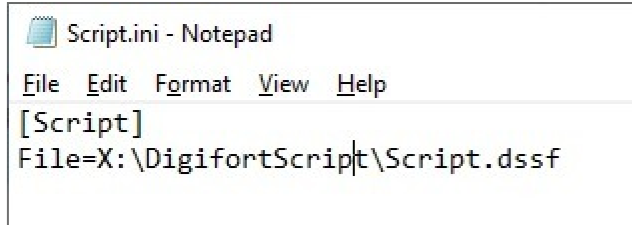
In this Script.ini file you will specify the path to the server registration file, as shown above.
Web Server:
You can place the server registration file on a Web Server, as long as all Surveillance Clients have access to this server. To instruct the Surveillance Client to download this file over the network, you must create a file called Script.ini and place this file within the client installation folder:
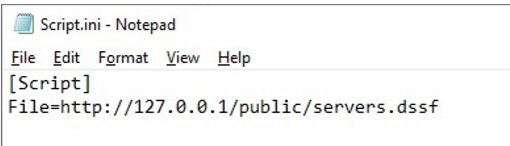
In the example above, the V Client will download the server registration file from the URL http://127.0.0.1/public/servers.dssf
You can use the File Server feature of the system's own embedded Web Server to provide the server registration file. See the Web Server File Server topic