To access this configuration, click on the Live View tab, as illustrated in the figure below:
The configuration made here will be applied to the Surveillance Client, it will use this information to capture the image from the cameras and display it on the screen.
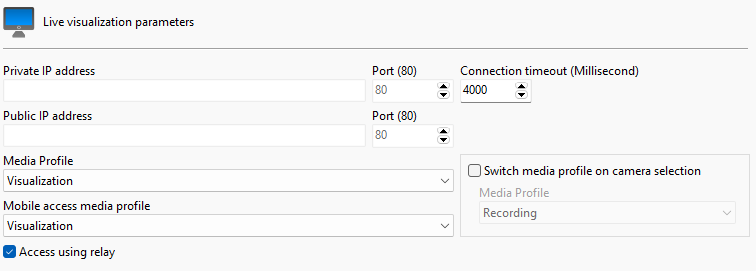
The parameters to be configured are described below.
•Access via Relay: When using this option (Selected by default), the client will receive images from the cameras through the system server instead of connecting directly to the camera. This is the recommended connection method as it allows greater security of the solution (As the cameras can be placed on a separate network from clients and other devices, accessible only by the server), lower use of bandwidth and camera resources (As all communication will be made through the server and there will be no duplicate streams on the network) and greater accessibility. With this option checked, the address and connection port options do not need to be configured. If this option is disabled, the Surveillance Client will connect directly to the cameras, therefore parameters such as address and port must be provided according to the network topology for client access.
•Private IP Address: If you do not use access to the camera through the relay server, enter the IP address of the camera's local network.
•Private IP Port: Enter the communication port with the camera on your internal network.
•Public IP Address: If the client is accessing through an external network, such as the internet, for example. Fill in your external IP address here. For this option to work, your router must be configured to provide access to the camera externally.
•Public IP Port: Enter the communication port with the camera via the external network.
•Connection Timeout: This parameter is used by the system when the connection to the camera is lost in some way. The server will attempt to re-establish the connection after the configured time. To convert this value to seconds, simply divide the value by 1000. By default, this parameter is set to 4000ms (4 seconds).
•Media Profile: Select the media profile to be used in the camera view.
•Mobile Media Profile: The system allows the use of a different media profile for viewing on mobile devices. Access via mobile devices generates a processing load on the server as the system needs to transcode the video before sending it to the device. If the camera is configured to record megapixel images the transcoding process can be cumbersome, generating an unwanted processing load on the server. This option will allow the selection of a media profile with a lower resolution to perform the transcoding, resulting in lower processor consumption.