To generate a self-signed certificate, we recommend using the OpenSSL library.
Install OpenSSL on your server. You can download binary files from this address: https://wiki.openssl.org/index.php/Binaries
1.Generate a Certificate Signing Request (CSR) along with the private key.
First, you must generate a CSR. The example below will generate a CSR and a private key in 2048-bit RSA format.
openssl req -newkey rsa:2048 -keyout PrivateKey.pem -out MyCsr.csr |
|---|
•openssl: Command to run OpenSSL.
•-req: New certificate signing request (CSR).
•-newkey rsa:2048: Specifies that a new private key should be created, with a 2048-bit RSA algorithm. If you prefer a 4096-bit key, you can change this number to 4096.
•-keyout PrivateKey.pem: Specifies the name of the output file (PrivateKey.pem), which will be in PEM format, encrypted.
•-out MyCsr.csr: Specifies the certificate signing request (CSR) file.
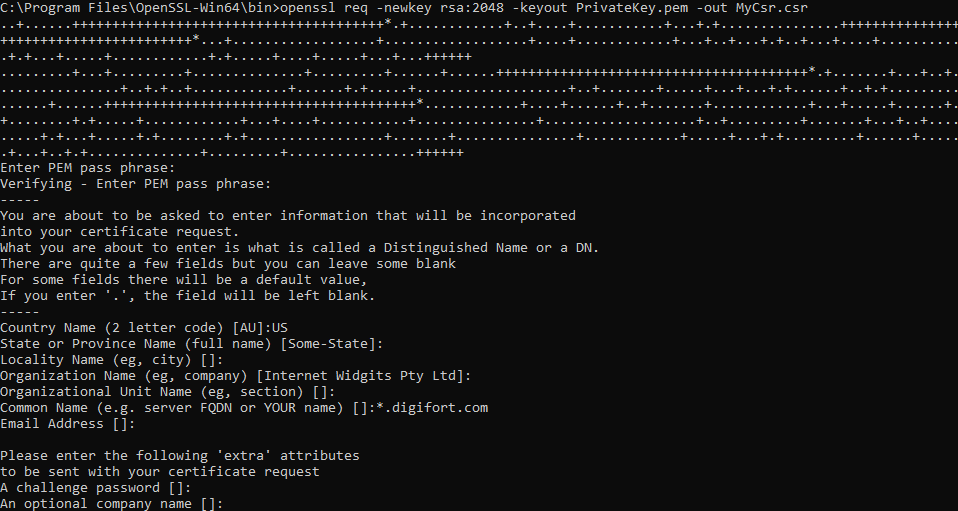
When you press Enter, you will be presented with a series of questions.
1.First create and verify the password for the file. Remember this password as you will need it again to access your private key.
2.Now you have to enter the information that should be included in your CSR. This information is also known as the Distinguished Name, or DN. The Common Name field is required by SSL.com when submitting your CSR, but the others are optional. If you want to ignore an optional item, just type enter when it appears:
3.The Country Name (optional) uses a two-letter country code.
4.The Locality Name field (optional) is for your city or town.
5.The Organization Name field (optional) is for the name of your company or organization.
6.The Common Name field (required) is used for the FQDN (Fully Qualified Domain Name) of the website that this certificate will protect.
7.E-mail address (optional).
8.The Challenge Password field is optional and can also be ignored.
Once this process is complete, you will be returned to a command prompt. You will not receive any notification that the CSR has been successfully created.
You should now have the PrivateKey.pem and MyCSR.csr files.
2.Generating the Self-Signed Certificate
You can now generate the self-signed certificate using the CSR and the private key. You will also specify the validity period of the certificate:
openssl x509 -req -in MyCsr.csr -signkey PrivateKey.pem -out SSLCert -days 365 |
|---|
•openssl: Command to run OpenSSL.
•x509: Public standard format for certificates.
•-req: Indicates that you are creating a certificate from a CSR.
•-in MyCsr.csr: Specifies the CSR file created in the previous step.
•-signkey PrivateKey.pem: Specifies the private key file created in the previous step.
•-out SSLCert: Indicates the certificate output file (SSLCert).
•-days 365: Indicates the validity of the certificate.
![]()
Press Enter, you will be required to enter the password for the private key file created in the previous step.
If the process completes successfully, you will now have the SSLCert file.
3.Root certificate
The generated certificate will also be used as the root certificate, so copy the SSLCert file to SSLRootCert
copy SSLCert SSLRootCert |
|---|
4.Private Key
Now we'll generate the SSLKey file, to do this use the following command:
openssl rsa-in PrivateKey.pem -out SSLKey |
|---|
Press Enter, you will be required to enter the password for the private key file created in the previous step.
Now you have the SSLCert, SSLRootCert and SSLKey files, copy these files and replace them in the system installation folder to load the certificates and restart the services.