The first step to be carried out when configuring a server is to add it to the list of servers to be managed by the Administration Client.
To add a server, click on the Add Server button, opening the server registration screen, as shown below:

•Server Type: The system has different types of services and modules. Select the type of server to add.
•Server Name: Enter the name of the server to be added. After confirming the data, the server name cannot be changed.
•Server IP: Enter the communication port with the server. By default the port is 8600 for standard connection or 8400 for secure connection with SSL/TLS.
•Port: Type the communication port with the server. By default the port is 8600
•Use SSL: Select this option to connect securely via SSL/TLS. The communication port will be changed to the default port 8400 and the server list will be updated to display only servers running with SSL/TLS.
•Servers: In this list, all servers of the selected type that the administration client found on the network will be available. By clicking on one of the servers, the IP and Port field described above will be automatically filled in, leaving only the Server Name field to complete the registration.
After entering all the data correctly, click OK.
After adding the server, it will be shown in the Settings Menu as shown in the figure below:
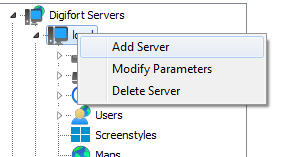
To change the parameters of an already saved server, right-click on the desired server and then click on Modify Parameters. In the window that opens, change the data as necessary and click OK.
To delete a server, right-click on the desired server and then click Delete Server. In the confirmation message that appears, click Yes.